Building a multi-tenant B2B SaaS with Vite, Tanstack React Router and Query - Part 1: The boilerplate
In this article, we'll start building a multi-tenant B2B SaaS using Vite, Tanstack React Router, React Query, Chakra UI and Saas UI.
Introduction#
React Server Components (RSC) are the new craze, but what if I told you SPA's (Single-page-app) are here to stay, especially for B2B applications.
This article is the first in a series where we'll build a multi-tenant B2B SaaS. We'll go over the basics of setting up Vite with Tanstack Router and a basic UI with authentication and building an API with Supabase.
Vite is a blazing fast build tool, built on modern standards like ESM and is highly extensible. Tanstack Router is a powerful new router for React with support for file based routing, is fully type-safe and has a great developer experience. We'll use Chakra UI with the Saas UI design system for styling.
This stack will be fully type-safe from backend, to routing, and styling. There's no magic, easy to reason about and just a pleasure to work with.
Add the end of this article you will have a basic multi-tenant UI boilerplate to build upon. You can get the full source code of this project on Github.
Setting up Vite#
First things first, let's set up Vite. We'll start by creating a new project with Vite.
npm create vite@latest my-saas -- --template react-ts
We'll also install the dependencies for Tanstack Router.
cd my-saasnpm i @tanstack/react-router @tanstack/router-devtools @tanstack/router-vite-plugin
Configure the Vite plugin#
Edit the vite.config.ts file and add the following configuration for the router plugin.
The router plugin will handle generating the route tree and types for us.
// vite.config.tsimport { defineConfig } from 'vite'import react from '@vitejs/plugin-react'import { TanStackRouterVite } from '@tanstack/router-vite-plugin'// https://vitejs.dev/config/export default defineConfig({plugins: [react(), TanStackRouterVite()],})
Setting up the router#
Now that we have the router plugin set up, we can start creating our routes. Create a new file called __root.tsx in the src/routes folder.
import { createRootRoute, Link, Outlet } from '@tanstack/react-router'import { TanStackRouterDevtools } from '@tanstack/router-devtools'export const Route = createRootRoute({component: () => (<><div><Link to="/">Home</Link></div><hr /><Outlet /><TanStackRouterDevtools /></>),})
Create the index route in routes/index.tsx.
import { createFileRoute } from '@tanstack/react-router'export const Route = createFileRoute('/')({component: Index,})function Index() {return (<div><h3>Welcome Home!</h3></div>)}
The Router plugin will generate the route tree for us based on the file structure. The __root.tsx file is the root of our route tree and will be used to render the main layout of our application.
We can now initialize the router and setup the context provider. Create a new file called provider.tsx in the src/context folder.
import { RouterProvider, createRouter, Link } from '@tanstack/react-router'import { routeTree } from '../routeTree.gen'// Set up a Router instanceconst router = createRouter({routeTree,})// Register things for typesafetydeclare module '@tanstack/react-router' {interface Register {router: typeof router}}export const Provider = () => {return (<RouterProvider router={router} />)}
Add the provider to the main.tsx file.
import React from 'react'import ReactDOM from 'react-dom/client'import { Provider } from './context/provider'ReactDOM.createRoot(document.getElementById('root')!).render(<React.StrictMode><Provider /></React.StrictMode>)
Great, we now have a basic setup for the router. Run the dev server with npm run dev and open the browser to see the basic layout with the home link and welcome message.
Styling#
To make our application look great, we'll use Chakra UI with the Saas UI design system. First, we'll install the dependencies.
npm i @saas-ui/react @chakra-ui/react @chakra-ui/next-js @emotion/react @emotion/styled framer-motion
Then we need to add the SaasProvider to the context/provider.tsx file.
import { forwardRef } from "react";import { SaasProvider } from "@saas-ui/react";import {Link,LinkProps,RouterProvider,createRouter,} from "@tanstack/react-router";import { routeTree } from "../routeTree.gen";// Set up a Router instanceconst router = createRouter({routeTree,});// Register things for typesafetydeclare module "@tanstack/react-router" {interface Register {router: typeof router;}}// This makes sure Saas UI components use our routerconst LinkComponent = forwardRef<HTMLAnchorElement, Pick<LinkProps, "href">>((props, ref) => {const { href, ...rest } = props;return <Link ref={ref} to={href} {...rest} />;});export const Provider = () => {return (<SaasProvider linkComponent={LinkComponent}><RouterProvider router={router} /></SaasProvider>);};
Now we can start using the Chakra UI components in our application. Let's update the routes/index.tsx file to use the Saas UI components.
import { Box, Heading } from '@chakra-ui/react'import { createFileRoute } from '@tanstack/react-router'export const Route = createFileRoute('/')({component: Index,})function Index() {return (<Box p="8"><Heading as="h1" mb="4">Welcome Home!</Heading></Box>)}
The app should look much better already :)
Cleanup#
We no longer need the App.tsx, App.css and index.css files that came with Vite, so we can remove them.
rm src/App.tsx src/App.css src/index.css
Setup React Query#
Now that we have the basic layout and styling set up, we can add React Query for data fetching and mutations.
Tanstack router supports loaders, which are functions that can be used to fetch data before rendering the component. Loaders work great with Tanstack Query, which is a powerful data fetching library for React. Let's set up Tanstack Query and create a simple loader to fetch some data.
npm i @tanstack/react-query @tanstack/react-query-devtools
After installing the dependencies, we need to add the QueryClientProvider to the context/provider.tsx file.
import { forwardRef } from 'react'import { LinkProps, SaasProvider } from '@saas-ui/react'import { RouterProvider, createRouter, Link } from '@tanstack/react-router'import { QueryClient, QueryClientProvider } from '@tanstack/react-query'import { routeTree } from '../routeTree.gen'const queryClient = new QueryClient()// Set up a Router instanceconst router = createRouter({routeTree,context: {queryClient,},defaultPreload: 'intent',// Since we're using React Query, we don't want loader calls to ever be stale// This will ensure that the loader is always called when the route is preloaded or visiteddefaultPreloadStaleTime: 0,})// Register things for typesafetydeclare module '@tanstack/react-router' {interface Register {router: typeof router}}// This makes sure Saas UI components use our routerconst LinkComponent = forwardRef<HTMLAnchorElement, Pick<LinkProps, 'href'>>((props, ref) => {const { href, ...rest } = propsreturn <Link ref={ref} to={href} {...rest} />})export const Provider = () => {return (<QueryClientProvider client={queryClient}><SaasProvider linkComponent={LinkComponent}><RouterProvider router={router} /></SaasProvider></QueryClientProvider>)}
What's notable here is we're setting up a QueryClient and providing it to the QueryClientProvider. We're also passing the queryClient to the router context, so we can use it in our loaders.
Setting the defaultPreload to intent will ensure that data is preloaded when the user hovers or clicks a Link.
We also set defaultPreloadStaleTime to 0, which will ensure that the loader is always called when the route is preloaded or visited. This is because React Query will handle the caching and we don't want the loader calls to ever be stale.
Router context#
To make sure the query client type is available in the router context, we need to add the type to the router.
Edit src/router/__root.tsx and change createRootRoute to createRootRouteWithContext.
import { QueryClient } from '@tanstack/react-query'import {createRootRouteWithContext,Link,Outlet,} from '@tanstack/react-router'import { TanStackRouterDevtools } from '@tanstack/router-devtools'export const Route = createRootRouteWithContext<{queryClient: QueryClient}>()({component: () => (<><div><Link to="/">Home</Link></div><hr /><Outlet /><TanStackRouterDevtools /></>),})
Fetching data#
Now we can create a simple loader to fetch some data. Create a new file called routes/profile.tsx in the src/routes folder.
We don't have an actual API to fetch data from, so we'll just return some dummy data for now.
import { createFileRoute } from '@tanstack/react-router'import { useQuery, queryOptions } from '@tanstack/react-query'import { Box, Heading } from '@chakra-ui/react'const profileQueryOptions = queryOptions({queryKey: ['profile'],queryFn: () => {return {id: '1',name: 'John Doe',}},})export const Route = createFileRoute('/profile')({loader: ({ context: { queryClient } }) =>queryClient.ensureQueryData(profileQueryOptions),component: Data,})function Data() {const { data } = useSuspenseQuery(profileQueryOptions)return (<Box p="8"><Heading as="h1" mb="4">Profile</Heading><pre>{JSON.stringify(data, null, 2)}</pre></Box>)}
Open the browser and navigate to the /profile route. You should see the dummy data displayed on the page.
Go ahead and delete this file again, we will create a proper API to fetch data from in the next article.
Adding layouts#
Now that we have the basics out of the way, let's add some more advanced features. We'll start by adding layouts to our application.
We'll be creating a SidebarLayout for the main layout of our application. This will also need a couple of components.
To make our lives a bit easier and to keep our codebase clean, let's first create an import alias, so we don't need to use relative imports.
Import alias#
Edit package.json and add the following to the imports field. This will use Node.js subpath imports feature, which is now also natively supported by Typescript.
The benefit of this is that's it's a native feature and doesn't need any bundler configuration or additional tooling.
{// ..."scripts": {// ...},"imports": {"#*": ["./src/*", "./src/*.ts", "./src/*.tsx"]}// ...}
Sidebar component#
Create a new file called sidebar.tsx in the src/components folder.
import { NavGroup, NavItem, Sidebar, SidebarSection } from '@saas-ui/react'import { getRouteApi } from '@tanstack/react-router'const route = getRouteApi('/_app/$workspace/')export const AppSidebar = () => {const params = route.useParams()return (<Sidebar><SidebarSection><NavGroup><NavItem href={`/${params.workspace}`}>Home</NavItem></NavGroup></SidebarSection></Sidebar>)}
The getRouteApi util is used to get the route API for the workspace route. This will allow us to get the workspace from the route params in a type-safe way.
Sidebar layout#
Create a new file called sidebar-layout.tsx in the src/layouts folder.
import { AppShell } from '@saas-ui/react'import { AppSidebar } from '#components/sidebar'export const SidebarLayout: React.FC<React.PropsWithChildren> = (props) => {return (<AppShell height="$100vh" sidebar={<AppSidebar />}>{props.children}</AppShell>)}
Layout route#
Layout routes are a way to wrap a route with a layout. This is useful for creating a consistent layout for a group of routes.
Create a new file called _app.tsx in the src/routes folder.
import { Outlet, createFileRoute } from '@tanstack/react-router'import { SidebarLayout } from '#layouts/sidebar-layout'export const Route = createFileRoute('/_app')({component: AppLayout,})function AppLayout() {return (<SidebarLayout><Outlet /></SidebarLayout>)}
All routes that are children of the _app/* route will now be wrapped in the AppLayout.
Routes prefixed with _ are considered pathless, and will not be part of the final route path.
This will allow us to create different root layouts for the app, authentication screens and marketing pages.
Let's clean up the root layout that we created initially. Edit src/routes/__root.tsx and remove the Link and html elements.
import { QueryClient } from '@tanstack/react-query'import { createRootRouteWithContext, Outlet } from '@tanstack/react-router'import { TanStackRouterDevtools } from '@tanstack/router-devtools'export const Route = createRootRouteWithContext<{queryClient: QueryClient}>()({component: () => (<><Outlet /><TanStackRouterDevtools /></>),})
Workspace route#
Since we're building a multi-tenant SaaS application we'll need a way to handle different workspaces.
We can do that using a dynamic route segments, or path parameters. Segments are prefixed with a $.
Create a new folder $workspace in /src/routes/_app and create a new file called index.tsx in that folder.
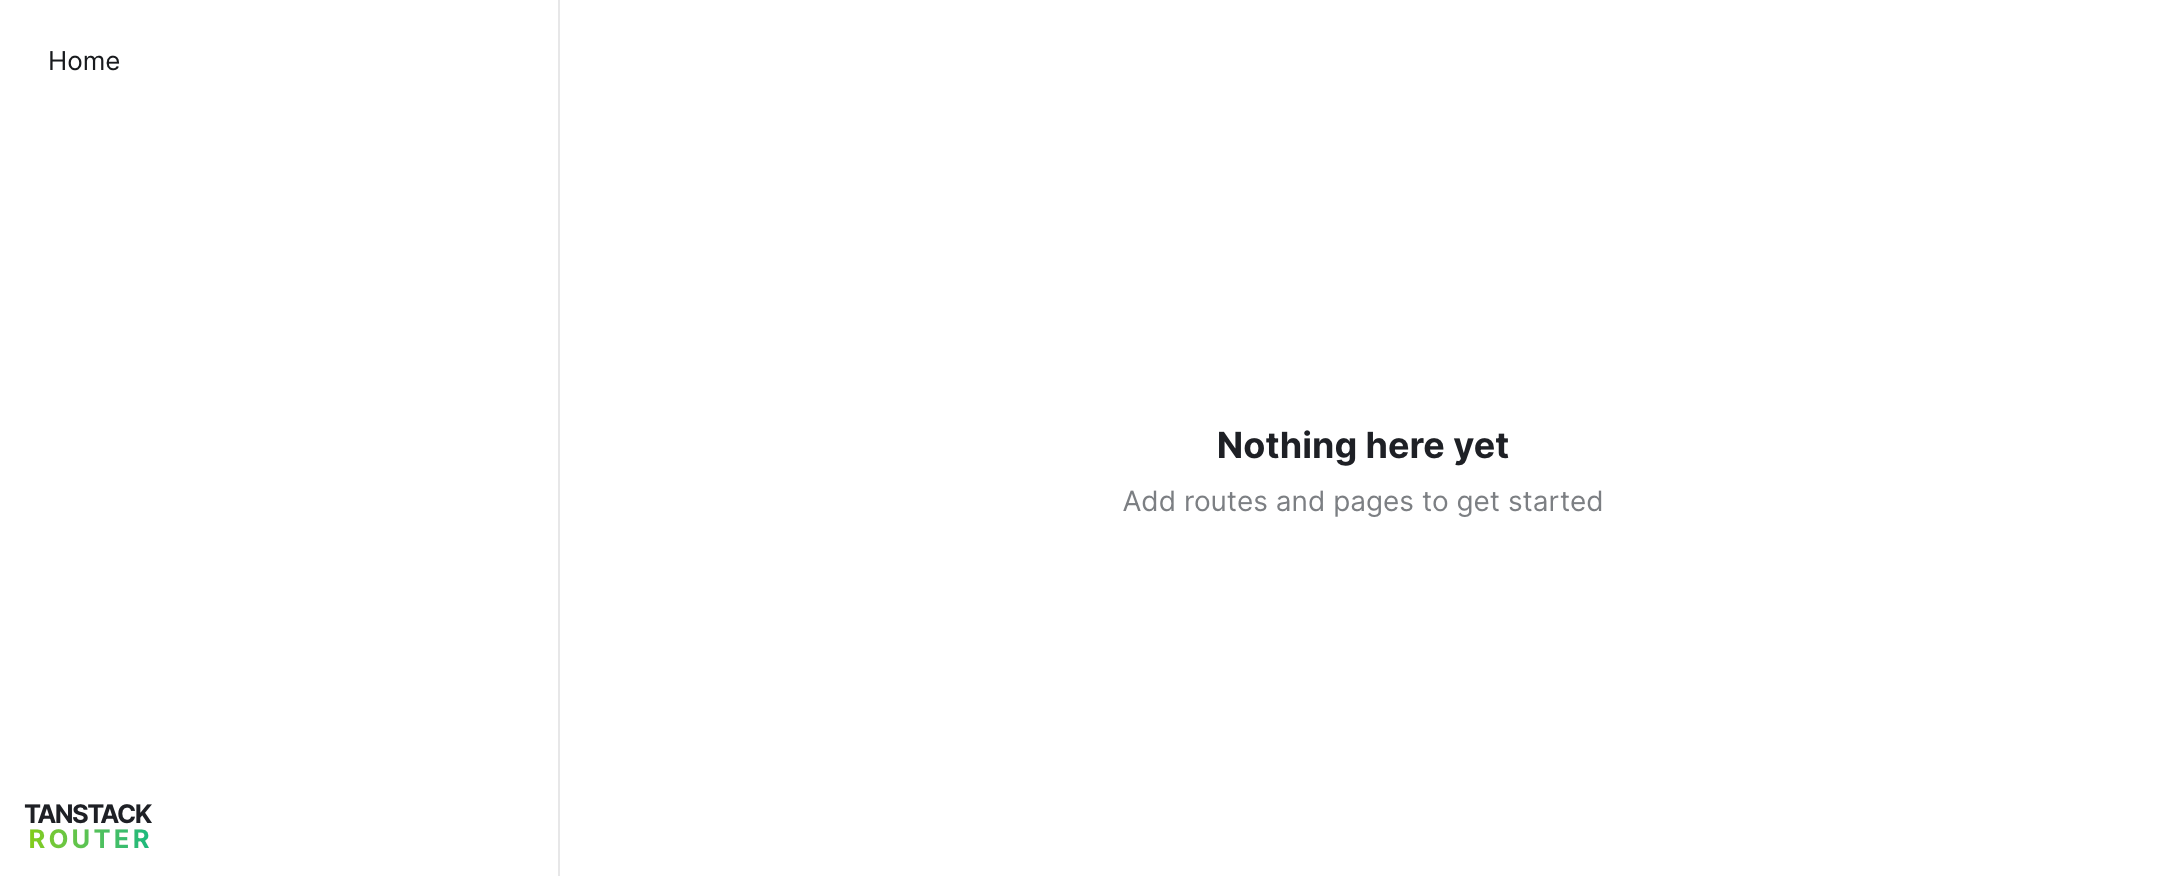
import { Center } from '@chakra-ui/react'import { EmptyState } from '@saas-ui/react'import { createFileRoute } from '@tanstack/react-router'export const Route = createFileRoute('/_app/$workspace/')({component: Home,})function Home() {return (<Center height="$100vh"><EmptyStatevariant="centered"title="Nothing here yet"description="Add routes and pages to get started"/></Center>)}
Open the browser and navigate to http://localhost:5173/test. You should see the sidebar layout with an empty state displayed on the page.
Amazing work so far! When you go to http://localhost:5173, you'll notice we don't have navigation anymore, and there's no way to navigate to the workspace route.
In the next steps we'll add an onboarding screen that will allow users to create a workspace and navigate to it.
Onboarding#
We'll create an onboarding screen that will allow users to create a workspace and navigate to it. Note that we haven't added authentication yet, don't worry about that for now, we'll cover that in the next article.
For the onboarding screens we want to use a different layouts, without the sidebar.
Create a new file called fullscreen-layout.tsx in the src/layouts folder.
This layout can be used for features like onboarding, that allow users to focus on a single task.
import { AppShell } from '@saas-ui/react'export const FullscreenLayout: React.FC<React.PropsWithChildren> = (props) => {return <AppShell height="$100vh">{props.children}</AppShell>}
Create the _onboarding.tsx layout route in the src/routes folder.
import { Outlet, createFileRoute } from '@tanstack/react-router'import { FullscreenLayout } from '#layouts/fullscreen-layout'export const Route = createFileRoute('/_onboarding')({component: OnboardingLayout,})function OnboardingLayout() {return (<FullscreenLayout><Outlet /></FullscreenLayout>)}
And create the page route in src/routes/_onboarding/getting-started.tsx.
import { Center, Container, Heading } from '@chakra-ui/react'import { Field, Form, FormLayout, SubmitButton } from '@saas-ui/react'import { useMutation } from '@tanstack/react-query'import { createFileRoute, useNavigate } from '@tanstack/react-router'import { FormEvent } from 'react'const slugify = (value: string) => {return value.trim().toLocaleLowerCase().replace(/[^\w\s-]/g, '').replace(/[\s_-]+/g, '-').replace(/^-+|-+$/g, '')}export const Route = createFileRoute('/_onboarding/getting-started')({component: GettingStarted,})interface OnboardingData {organization: stringworkspace: string}function GettingStarted() {const navigate = useNavigate()const submit = useMutation<unknown, Error, OnboardingData>({mutationFn: async (values) => {localStorage.setItem('workspace', values.workspace)},onSuccess: (data, variables) => {navigate({to: '/$workspace',params: { workspace: variables.workspace },})},})return (<Center height="$100vh"><Container maxW="container.sm"><Heading as="h2" size="lg" mb="4">Getting started</Heading><FormonSubmit={(data) => submit.mutateAsync(data)}defaultValues={{organization: '',workspace: '',}}>{({ setValue }) => (<FormLayout><Fieldlabel="Organization name"name="organization"onChange={(e: FormEvent<HTMLInputElement>) => {const value = e.currentTarget.valuesetValue('organization', value)setValue('workspace', slugify(value))}}/><Field label="Workspace" name="workspace" /><SubmitButton>Continue</SubmitButton></FormLayout>)}</Form></Container></Center>)}
Ok, so what's going on here? We're using the useMutation hook from Tanstack Query to handle the form submission. When the form is submitted, we'll save the workspace to localStorage and navigate to the workspace route.
We're using Saas UI Form component that allows us to quickly created type-safe forms. It also has support for Zod, Yup and JsonSchema.
Whenever the organization value changes we automatically update the workspace value using the slugify function to pre-fill the workspace field.
The screen should look like this:
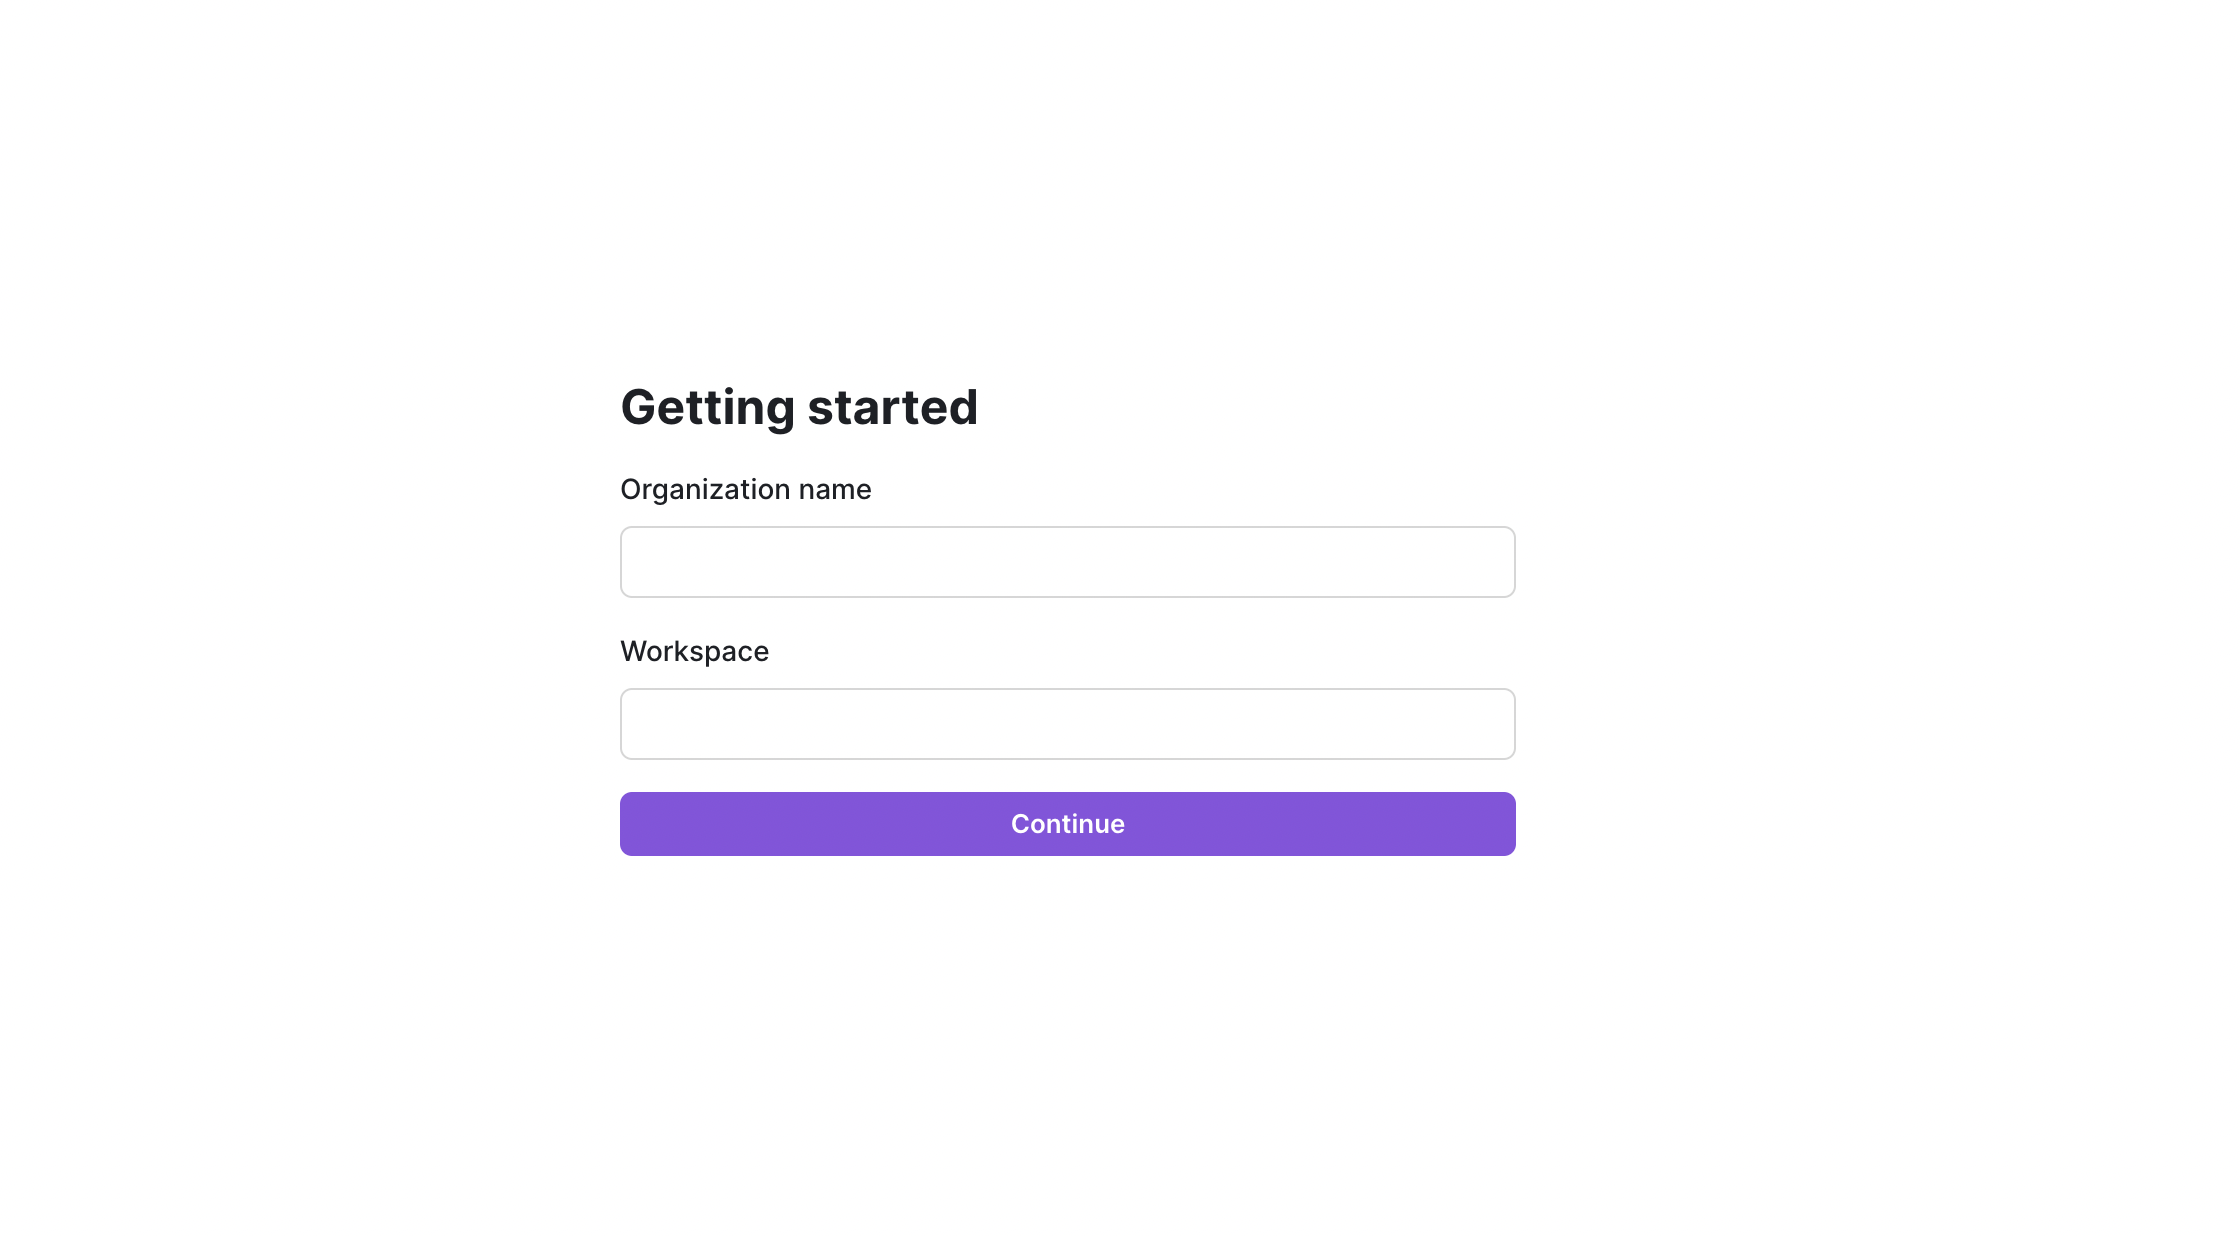
Try it out yourself at http://localhost:5173/getting-started.
Redirecting the user#
When the user navigates to the root of the application, we want to redirect them to the workspace route if they have a workspace in localStorage, otherwise we want to redirect them to the onboarding screen.
Edit src/routes/index.tsx and add the following code.
import { Box, Heading } from '@chakra-ui/react'import { createFileRoute, redirect } from '@tanstack/react-router'export const Route = createFileRoute('/')({component: Index,beforeLoad: async () => {// We will add authentication here laterconst user = {id: '123',email: 'john.doe@acme.com',}if (!user) {return}const workspace = localStorage.getItem('workspace')const path = workspace ? `/${workspace}` : '/getting-started'throw redirect({to: path,})},})function Index() {return (<Box p="8"><Heading as="h1" mb="4">Welcome Home!</Heading></Box>)}
We're using the beforeLoad hook to check if the user has a workspace in localStorage. If they do, we'll redirect them to the workspace route, otherwise we'll redirect them to the onboarding screen.
If the user is not authenticated, we'll just return and show the home screen.
Now navigate to http://localhost:5173 and you should be redirected.
Conclusion#
In this article, we've set up a basic multi-tenant B2B SaaS application boilerplate using Vite, Tanstack Router, Chakra UI and Saas UI. We've also added React Query for data fetching and mutations, and created a simple onboarding screen.
In the next article, we'll add authentication (Supabase Auth), and a proper API to fetch data from. I'm not sure yet what we're going to use for the API, we might use Supabase directly or use Hono, what do you think?
Resources#
Was this helpful?